Backoffice MCP Integration
PlayServ Backoffice includes an MCP integration that allows an AI assistant to interact directly with your projects — reading and modifying the schema, managing data records, and accessing project configuration — all through a conversation interface.
This is powered by Model Context Protocol (MCP), an open standard that allows AI models to interact with external systems through a defined set of tools. In PlayServ, the MCP server exposes schema and data operations as tools, so the AI assistant can take meaningful actions inside the Backoffice — not just describe what to do, but actually do it.
What the MCP integration can do
Create and modify schema objects
The assistant can create Entities, Entity Parts, Enums, fields, and references, as well as extend or modify objects that already exist. Changes appear immediately in the Backoffice schema editor.
Generate a schema from a Game Design Document
Given a GDD or any structured description of the game data model, the assistant can parse the document and build the corresponding schema — creating all objects, fields, and relationships in one pass. For details, see Generate a schema from a Game Design Document.
Create and manage data records
The assistant can create records for any Entity in the project and work with existing data — reading, updating, or organising records through the conversation interface.
Access project configuration and metadata
The assistant can read project-level configuration and metadata, making it easier to inspect settings or verify the state of the project without navigating through the Backoffice manually.
How MCP works in this context
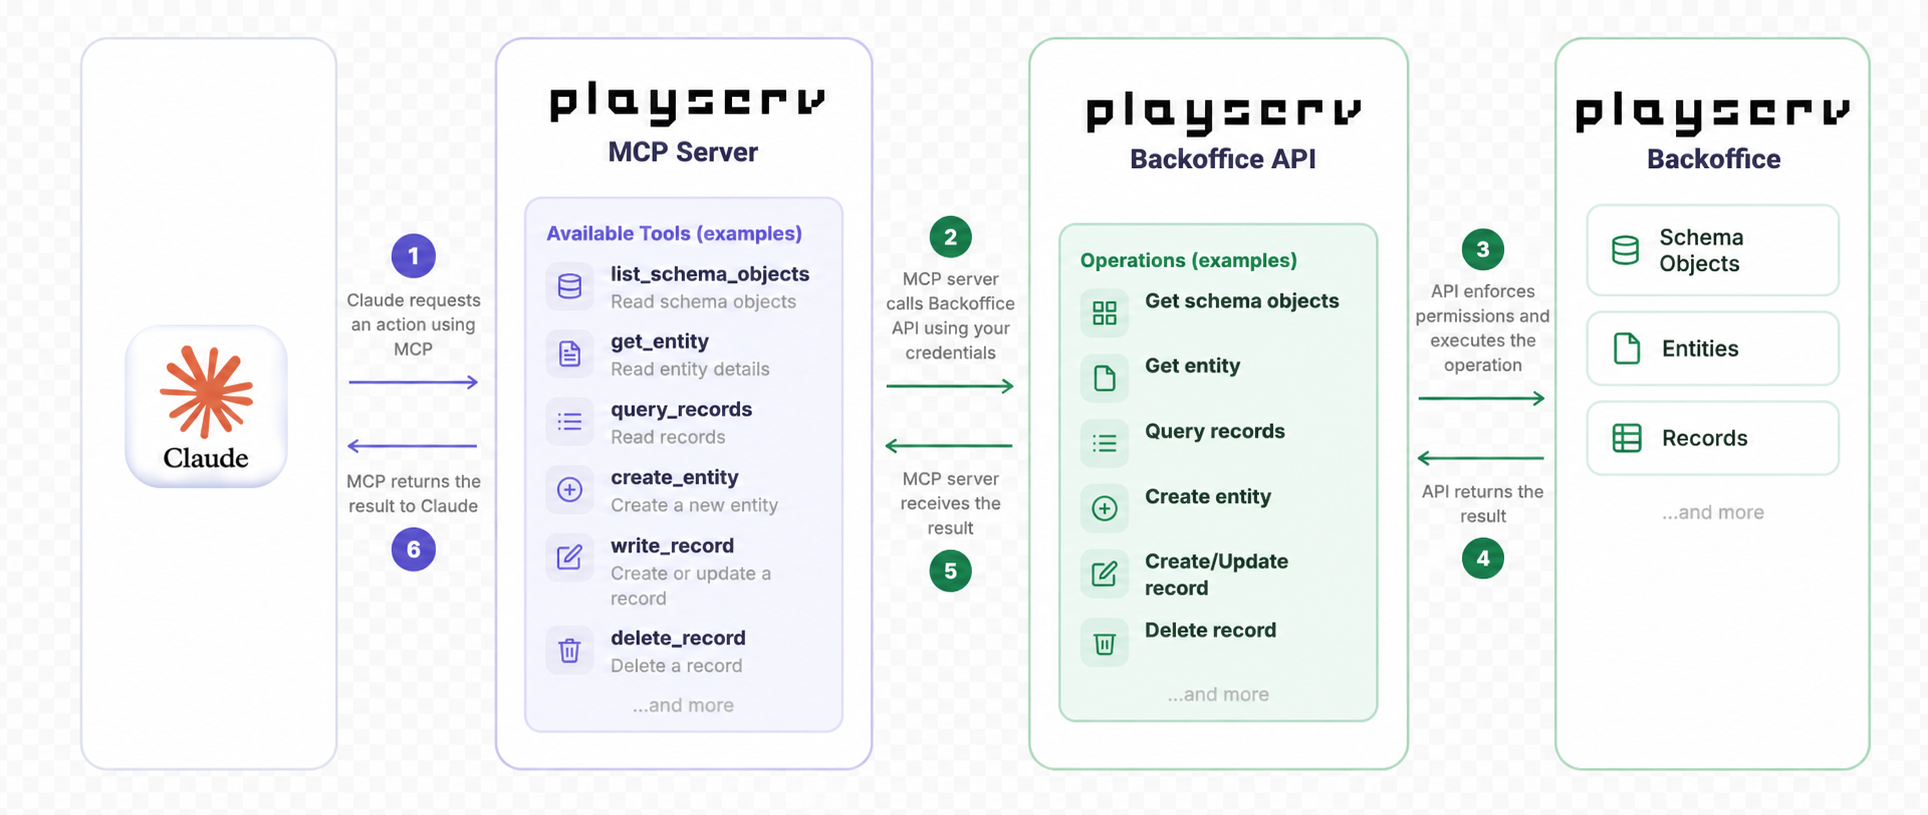
MCP defines a standard way for AI models to call tools exposed by a server. When you connect the PlayServ MCP server to Claude, the assistant gains access to a set of tools that map directly to Backoffice operations — reading schema objects, creating entities, writing records, and so on.
Each action the assistant takes goes through the same API used by the Backoffice editor. The assistant cannot do anything that a regular Backoffice user cannot do; it operates within the same permission boundaries as your account.
Set up the MCP connection
Before you can use the assistant, you need to connect the PlayServ MCP server to your Claude account. The process differs slightly depending on whether you use a personal or a team account.
The MCP server URL is available in Backoffice under Organization Settings → Integrations → MCP Server.
Personal account (Pro)
Use this flow if you access Claude through a personal claude.ai account.
Open Settings
Click your avatar in the bottom-left corner of Claude, then select Settings from the menu.
Go to Integrations
In the left sidebar, click Integrations.
Add the PlayServ connector
Click Add more, then select Add custom connector. Fill in:
- Name —
PlayServ - Remote MCP server URL — the URL from your Backoffice organization settings
Then click Add.
Start a conversation
Open a new chat. The PlayServ tools are now available. Verify by asking: "What tools do you have access to?" — the assistant should list the PlayServ Backoffice tools.
Team or Enterprise account
Use this flow if your organisation uses Claude under a Team or Enterprise plan.
Open Organization settings
Click your avatar in the bottom-left corner of Claude, then select Organization settings from the menu.
Go to Connectors
In the left sidebar, scroll down to the Libraries section and click Connectors.
Add the PlayServ connector
Click + Add in the top-right corner. Fill in:
- Name —
PlayServ - Remote MCP server URL — the URL from your Backoffice organization settings
Then click Add.
Start a conversation
Open a new chat. The PlayServ tools are now available. Verify by asking: "What tools do you have access to?" — the assistant should list the PlayServ Backoffice tools.
Connect to a project
Once the MCP server is connected, tell the assistant which project to work with by providing the project slug.
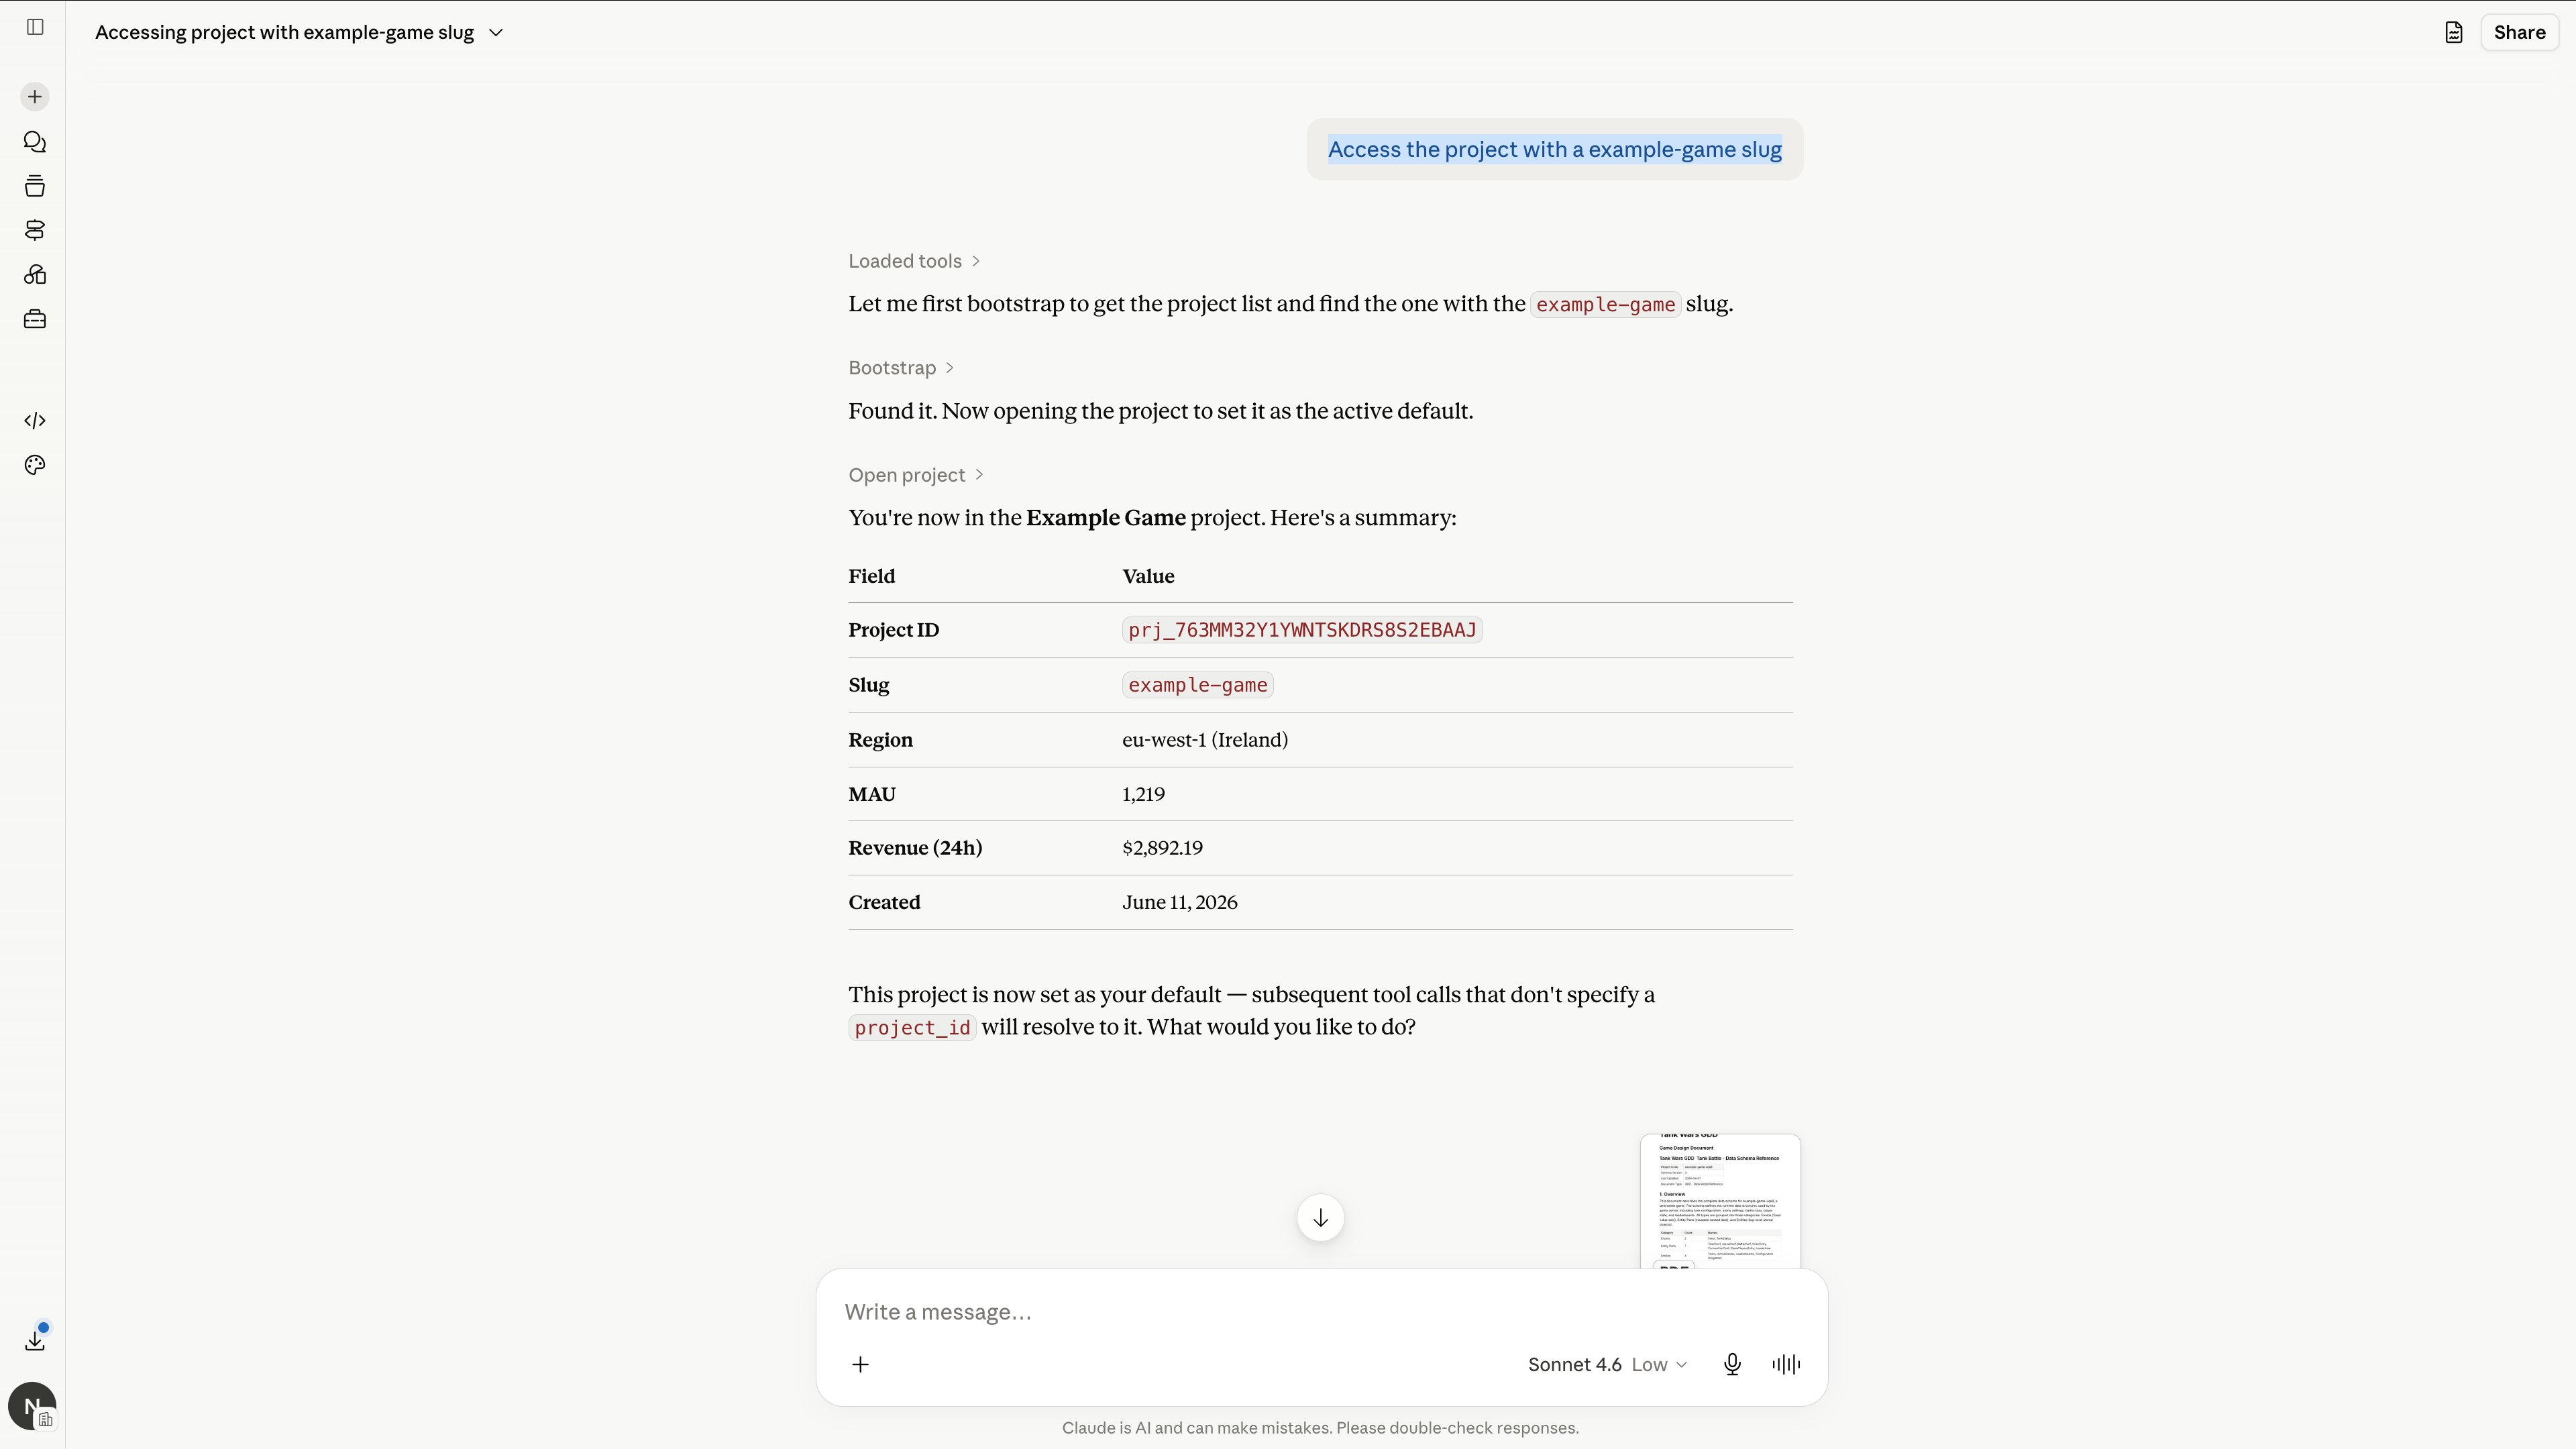
Access the project with a example-game slug
You can find the project slug in Backoffice under Project Settings → General.
The assistant bootstraps the project list, finds the matching project, and sets it as the active default. All subsequent tool calls in the conversation will resolve to it automatically.
Do not send the SDK Key to the assistant. The SDK Key is a runtime credential used by your game client to authenticate API requests. It is not needed for schema or data operations. Treat it the same way you would treat a production secret.
Work with an existing schema
After connecting to a project, you can ask the assistant to inspect or modify the schema in natural language. The assistant describes what it is about to do before making any changes — review its plan before confirming.
Here are common scenarios with examples of what to say and what the assistant does.
- Inspect schema
- Add a field
- Create an enum
- Explore relationships
- Refactor
Generate a schema from a Game Design Document
If you have a GDD or a structured description of your game data model, paste it into the conversation and ask the assistant to build the schema from it.
The assistant will parse the document, propose an entity structure, and create the objects once you approve.
Before the assistant starts making changes, ask it to summarise what it found and what it plans to create. This gives you a chance to review the proposed structure before anything is written to the schema.
AI-generated schemas may not match your intent exactly. Always review the structure in the schema editor before building data on top of it. Renaming or removing fields after records exist is destructive and requires a migration.
Next step
Once the schema is in place, the next step is to add records to it.